Objective
In the dynamic realm of software development, we often find ourselves navigating the complexities of Continuous Integration and Continuous Deployment (CI/CD) pipelines. As developers, we encounter scenarios where automation is not just a convenience but a necessity, especially when orchestrating tasks on the target server where our projects unfold. This is particularly true in the dichotomy of sandbox and production environments, where precision and efficiency are paramount.
Exploring Crucial Use Cases:
- Auto Deployment of Latest Code
Learn how to seamlessly deploy the latest code onto your server directly from the repository, ensuring your applications are always up-to-date.
- Containerized Deployment with Docker Images
Delve into the integration of GitHub Actions with SSH Agent and SSH Keys to automate the process of pulling Docker images from the repository and running containers effortlessly.
- Automated Code Scanning
Uncover strategies to incorporate automatic code scanning into your CI/CD pipeline, providing an additional layer of security and code quality assurance.
- Run Automated Test Cases
Discover the power of running automated test cases automatically after pulling the latest code, ensuring the stability and reliability of your applications.
- Custom Bash Scripts for CI/CD
Explore the versatility of GitHub Actions by running custom bash scripts tailored to your specific needs. Whether it's orchestrating complex deployment sequences or executing specialized actions, GitHub Actions has you covered.
In this comprehensive guide, we will unravel the intricacies of GitHub Actions, SSH Agent, and SSH Keys, empowering you to streamline your CI/CD processes efficiently. Let's embark on a journey to master secure automation and elevate your development workflows.
Let’s Get Started
Before we dive into the intricacies of GitHub Actions, SSH Agent, and SSH Keys, let's ensure our environment is ready. For the purpose of this guide, we're assuming you're working with an Ubuntu 22.04 server. However, fear not if your server runs on a different operating system; the principles and commands remain largely transferrable.
Security is paramount, and one way to bolster it is by using key pairs for authentication. We're assuming that your server is configured to allow access only through SSH key pairs, not passwords. This provides an additional layer of protection, enhancing the overall security posture of your CI/CD setup.
Step 1: Create a separate OS user
1.1 Generate an RSA Key Pair Locally
Begin by creating an RSA key pair on your local machine. This pair will be instrumental in configuring a dedicated OS user on your server.
When prompted for a passphrase, leave it blank for the purpose of this task. The command above generates two files: github-actions (private key) and github-actions.pub (public key).
1.2 Create the OS User on the Server
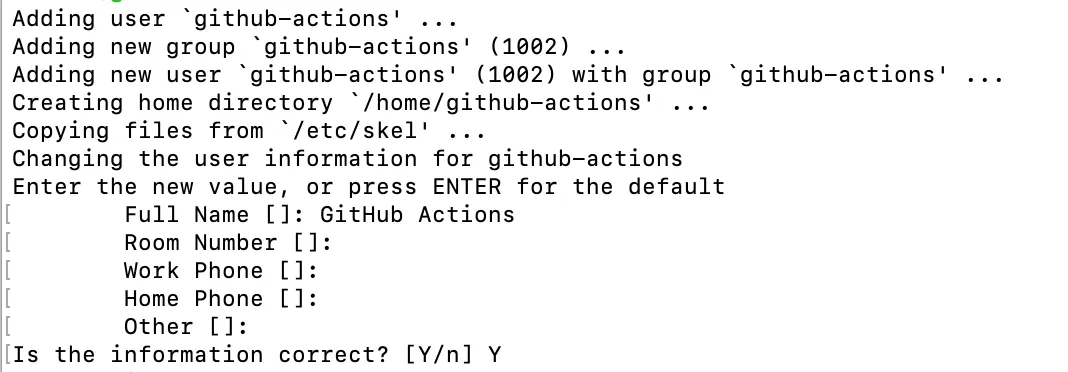
Now, let's log in to your server and set up the OS user. In this guide, we'll name our user github-actions.
Follow the prompts to provide any additional information you wish to associate with the new user. This step ensures that you have a dedicated user for GitHub Actions, enhancing the security and manageability of your CI/CD workflows.
By isolating processes and permissions to a specific user, you not only bolster security but also streamline the management of tasks related to GitHub Actions. This separation facilitates a more organized and controlled CI/CD environment.
1.3 Configure the User with the Generated Key Pair
Now that we have created the OS user, let's configure it to use the key pair generated in the previous steps.
By following these steps, you've successfully configured the GitHub Actions user to use the generated key pair. This establishes a secure and authenticated connection, enabling GitHub Actions to interact with the server seamlessly.
1.4 Optional - Granting sudo Access
In certain scenarios, you might require the GitHub Actions user to have sudo privileges. This step is optional and should be handled with caution to maintain security.
This command appends a line to the sudoers file, granting sudo access to the GitHub Actions user without requiring a password.
Note: While providing sudo access can be convenient for certain tasks, exercise caution and limit permissions to only what is absolutely necessary for your CI/CD workflows. Alternatively, ensure that the scripts and commands you intend to run are accessible and executable by the GitHub Actions user without the need for elevated privileges.
By following this optional step, you accommodate scenarios where your CI/CD processes necessitate administrative permissions. However, always prioritize security and adhere to the principle of least privilege when assigning permissions.
1.5 Optional - Adding User to the Docker User Group
If your CI/CD workflows involve Docker operations and you want the GitHub Actions user to perform these tasks, you can add the user to the Docker user group. This step ensures that the user has the necessary permissions to interact with Docker.
This command adds the GitHub Actions user to the Docker group. After executing this command, it's important to log out and log back in for the changes to take effect. You can also use the following command to apply the changes without logging out:
By following this optional step, you empower the GitHub Actions user to seamlessly execute Docker commands. This can be essential if your CI/CD pipeline involves containerization, allowing your workflows to leverage the power of Docker for tasks such as building and deploying applications in containers.
Step 2: Configure Secrets in GitHub Actions
Secrets play a crucial role in securely managing sensitive information within GitHub Actions. Secrets are variables that you create in an organization, repository, or repository environment. The secrets that you create are available to use in GitHub Actions workflows. GitHub Actions can only read a secret if you explicitly include the secret in a workflow. Follow these steps to configure the necessary secrets for our CI/CD objective.
2.1 Open Organization Settings and Navigate to Secrets
- Go to your GitHub account and access your Organization Settings (not the profile settings).
- Navigate to Secrets and Variables > Actions.
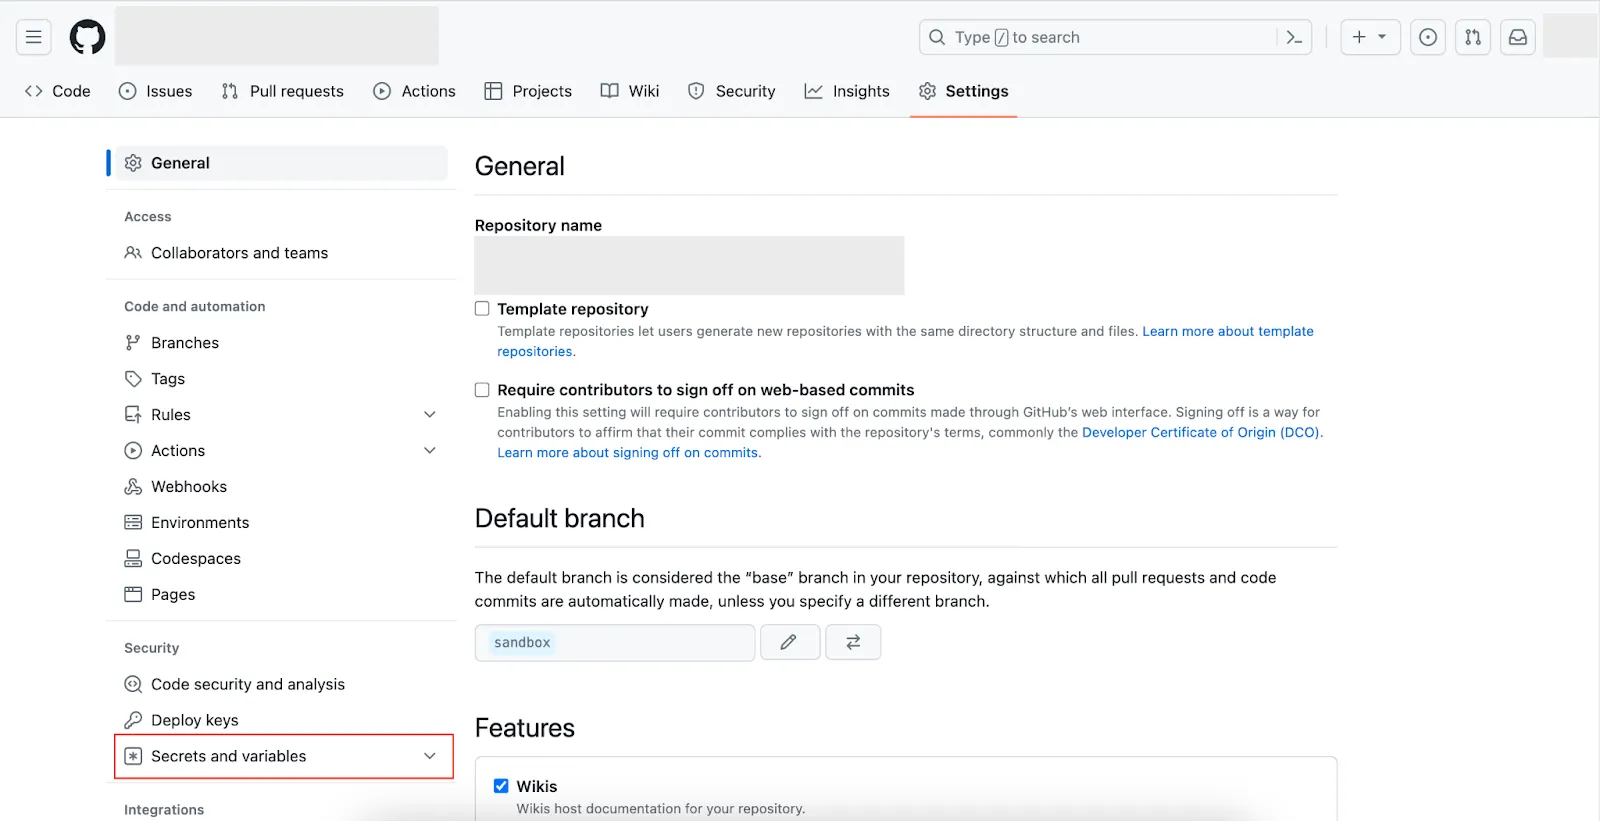
2.2 Create 3 Repository Secrets
Click on New Repository Secret and define the following three secrets:
- SERVER_IP:
Enter the IP address or hostname of your server.
- SERVER_KEY:
Enter the private key for the github-actions user that we generated in Step 1.1.
- SERVER_USER:
Enter github-actions as the value.
By adding these secrets, you create a secure mechanism for GitHub Actions workflows to access sensitive information without exposing it directly in your workflow files.
Note: It's crucial to securely manage and protect your secrets. Avoid hardcoding sensitive information directly into workflow files, as it poses security risks. Instead, leverage GitHub Secrets to store and retrieve this information securely.
These secrets will be instrumental in the subsequent steps as we integrate GitHub Actions with SSH Agent and SSH Keys to automate CI/CD pipelines on your server.
.webp)
Step 3: Create Your Deployment or Automation Script on the Server
In this step, we'll create a bash script on the server to execute deployment or automation tasks as part of your CI/CD process.
3.1 Create the Bash Script
Run the following commands to create and edit the deployment script:
3.2 Add Script Content
Inside the nano editor, add the following content to your deploy.sh script. This example script prints "Hello World!" for demonstration purposes. You can replace this content with your actual deployment or automation commands.
#!/bin/bash
echo "Hello World!"
3.3 Save and Exit
To save and exit the nano editor, press Ctrl + X, then press Y to confirm changes, and finally, press Enter.
Your deployment script is now ready. This script will serve as the basis for the automation tasks you want to execute as part of your CI/CD pipeline.
Make sure to adapt the script to fit your specific deployment requirements. If your actual deployment involves pulling code from a repository or building Docker images, modify the script accordingly.
In the next sections, we'll integrate this script with GitHub Actions to automate its execution when triggered by specific events.
Step 4: Create a Workflow File
In this step, we'll create a workflow file that instructs GitHub to execute the defined workflow whenever changes are pushed to the specified branch. This workflow will automate the deployment process using the script we created earlier.
4.1 Open your Project and Create Workflow File
Open your project code from any editor of your choice and create a file: .github/workflows/ci-cd.yml
4.2 Add Workflow Content
Paste the following content into your ci-cd.yml file:
name: example-ci-cd
on:
push:
branches:
- sandbox
workflow_dispatch:
jobs:
deploy-sandbox:
if: github.ref == 'refs/heads/sandbox'
name: Deploy to New Sandbox
runs-on: ubuntu-latest
steps:
- name: Install SSH
uses: shimataro/ssh-key-action@v2
with:
key: ${{ secrets.SERVER_KEY }}
known_hosts: unnecessary
- name: Key setup
run: |
ssh-keyscan -H ${{ secrets.SERVER_IP }} >> ~/.ssh/known_hosts
- name: SSH script
run: |
ssh ${{ secrets.SERVER_USER }}@${{ secrets.SERVER_IP }} 'sh /apps/scripts/deploy.sh'
4.3 Save and Commit
Save the file and commit it to the repository, specifically in the sandbox branch. Pushing the changes to this branch will trigger the GitHub Actions workflow.
4.4 Monitor the Workflow
As soon as you push the code, navigate to the GitHub Actions console to monitor the workflow's progress. You should see the workflow being triggered and the deployment process automated by GitHub Actions.
Congratulations! You have successfully set up a CI/CD pipeline using GitHub Actions with SSH Agent. This workflow will execute the deployment script whenever changes are pushed to the specified branch, facilitating an automated and efficient development pipeline.


.svg)

.svg)


.svg)

.svg)

.webp)





.png)
.png)
.png)
.png)
.png)
.png)


